Lesson 7
Passthrough Signals, Timers

Download the week 7 project
Timers
To recap, a signal is something that can be emitted to indicate that something has happened, such as a Button being clicked, or an Area2D entering another Area2D. You can connect a signal to one or more functions to have those functions be called when the signal is emitted.
There are many circumstances where when one signal is emitted, rather than calling a function in one of your scripts, you want it to result in another signal being emitted. This is called a passthrough, because the signal is passing through your script to another signal. Remember that to emit a signal, you call its emit function. Because emit() is a function, it can be the target of another signal's connect() function.
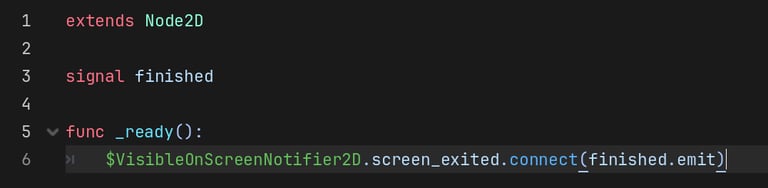
In the example above, we connect the VisibleOnScreenNotifier2D's screen_exited signal to our own finished signal, meaning that the finished will automatically be emitted when the VisibleOnScreenNotifier2D exits the screen. Remember that you must connect a signal to a function, not object, so we connect it to the signal's emit function, not the signal itself. Also remember that you are passing the function as an argument, so you do not include the parentheses () for emit in this case.
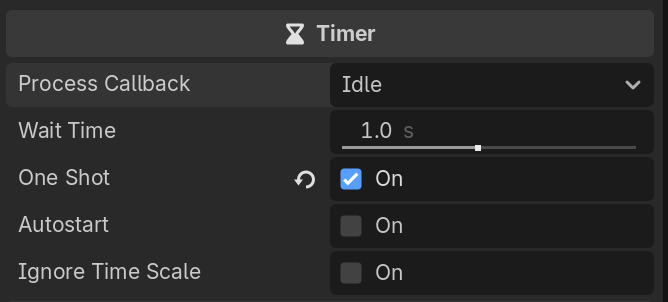
A Timer is a very useful type of node that can be used to trigger some behavior after an amount of time has elapsed. The Timer has a Wait Time, which can be set in the Inspector or in your script if you need to change it at runtime. The wait time is how much time will elapse before the Timer emits its timeout signal. If the One Shot property is true, then the Timer will only timeout once and then stop. Otherwise, it will start over once it times out and keep emitting its timeout signal after its wait time has elapsed. You can also configure the Timer to Autostart, meaning it will start automatically once added to the scene. Otherwise, you will need to manually start it by calling start() in a script.
Timers are incredibly useful in game design, as you will find there are many things that you want to do in your game after some time has elapsed. For example:
Spawn new enemies or waves
Have an effect ware off after a few seconds
Delay transitioning to a new scene or game state
Have an item despawn if not picked up
etc.
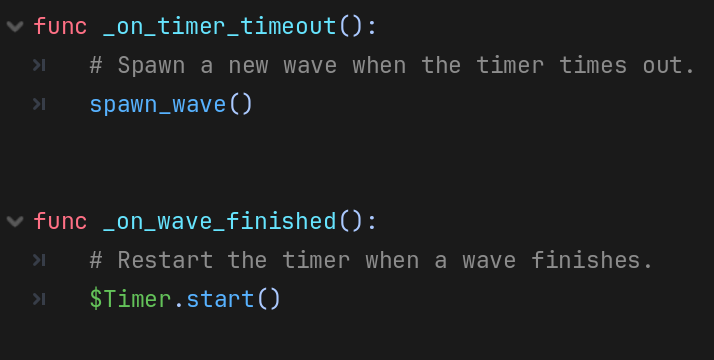
Here's a brief example of how a Timer might be used to trigger some behavior in a script. We can use a Timer to determine when it's time to spawn a new wave, and then once the wave has finished, restart the timer. This creates a small delay between waves. In this example, the Timer is single-shot (One Shot property is true) so that we control when the Timer starts.
Passthrough Signals
Homework
Create a Wave
Create a new scene with a Node2D root, save it as Wave1 (since you will be making several waves)
You might want to copy the background and player from the main scene to use them as references for placing obstacles and collectables. Just be sure to remove them before saving the scene!
Add obstacles and collectables in any pattern you want.
Add a VisibleOnScreenNotifier2D child that covers everything on the screen (all obstacles and collectables).
Add a script to the root node and name it Wave.gd.
Add a signal named finished.
In the ready() function, connect the VisibileOnSceenNotifier2D's screen_exited signal to your finished signal.
(OPTIONAL) Add a Difficulty property to your script so you can define different waves as Easy, Normal, or Hard.
Create multiple waves with different patterns of collectables and obstacles.
Create Wave Spawner
Create a new scene with a Node2D root, save it as WaveSpawner.
Add a Marker2D child node and rename it SpawnMarker
Position it just off screen to the right, but make sure the y-coordinate is 0!
Add a Timer child node and rename it SpawnTimer.
Check the checkbox to make it a One Shot timer, meaning it doesn't continue running after it times out.
Add a script to the root node, name it WaveSpawner.gd.
As always, you can download this script from the class resources folder, but try to write it yourself first.
Add export vars to the script for spawnTimer (time until a new wave is spawned), spawnTimerVariation (adds variation to the spawn timer so it's not always the same), and waves (an array that will hold all of the Wave scenes you can spawn).
Add local (not export) var for currentWave (the current wave).
Add the following functions:
pick_wave(): Pick a random scene from the waves array. If you want, you can add additional logic to only pick waves based on the current difficulty.
spawn_wave(): Calls pick_wave() and creates a new instance of the selected scene at the Marker2D's position. Connect the wave's finished signal to your despawn_wave() function.
despawn_wave(): Destroys the current wave and starts the timer until the next wave is spawned.
move_wave(delta): Moves the current wave based on the game's (player's) speed. Be sure to check if there IS a current wave before moving it!
_on_spawn_timer_timeout(): Connect to the SpawnTimer's timeout signal, use it to call spawn_wave() when the timer times out.
In your _process() function:
Call move_wave(delta) to move the current wave.
(EXTRA) Debug Class Wave Spawner
At the end of class, there was a bug with the Wave Spawner where the waves were remaining on screen and not being destroyed. I have uploaded the version of the project that includes this bug, along with a version that is fixed. See if you can figure out what the problem was.
You can add print statements throughout the script to track what is happening while the game runs.
(hint: the problem is not in the wave spawner script, but adding print statements may help you determine what the problem is...)