Lesson 9
State Machines

Download the week 9 project
A finite state machine, often simply called a state machine, is an abstract model made up of a finite number of discrete states. Only one state can be the "current" state at any time, and you can transition between states based on different triggers or conditions. A state defines how the system is currently behaving, what actions are permitted, and how the scene updates each frame. A transition represents a change from one state to another and is often initiated by some a trigger, such as the player dying or a certain amount of time passing. States can also have enter and exit actions, which are things that happen immediately upon entering the state, or just before transitioning to a different state.
Finite State Machines

State machines are a fundamental concept in video game design. The are used in all sorts of systems, such as:
NPC Behavior (Idle, Searching, Fleeing, Dying, ...)
Animations
Game States (Main Menu, Loading, Playing, Paused, ...)
UI Systems
Quest Systems
In a very simple way, we've already implemented a state machine in the Run Jumper game in the form of the player's behavior. The player can be in one of 3 states at any given moment: Running, Jumping, or Dead. Pressing the action/jump key transitions from the Running to Jumping state. Landing on a floor or ceiling transitions from the Jumping state back to the Running state. Hitting an obstacle while in either state will transition to the Dead state. This is a very simple state machine, because the player behaves differently in each state.
State Machine Diagrams
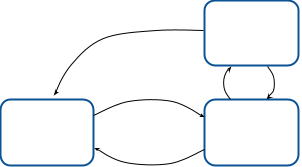
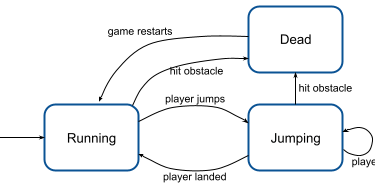
When designing a state machine for your game, it is usually helpful to visualize the entire state machine with all of its states and transitions so that you can see the big picture and make sure you aren't overlooking anything. This is done with a state machine diagram, also known as a state chart. This is a simple block diagram that uses boxes for each states and arrows for the transitions. If we wanted to diagram the state machine for our player, it would look like this.

Every state machine diagram has a starting state, represented by a circle. This doesn't represent an actual state in the game, but rather a way of showing which of the actual states you will start at. They can also include an end state (also a circle, not included above), which is where you exit the state machine (ex, the game ends). You can clearly see from the state machine diagram above each of the states that the player can be in and what causes you to transition from one state to another.
Also take note of the fact that a the Jumping state loops back on itself. This indicates that, while in the Jumping state, you can trigger a transition back into the Jumping state. While this may seem unnecessary since you're already in that state, remember that states and can enter and/or exit actions, meaning something happens upon entering that state, even if you are already in that state. What this means in this specific example is that if you are in the Jumping state, jumping again triggers the same actions that would trigger if you transitioned from Running to Jumping (play the jump sound effect, flip gravity, etc.)
It is also useful to document each state, including a description of what the state means (i.e., what is happening while in this state), the enter and exit actions, and the transitions to other states. This isn't captured directly in the state machine diagram, but would be accompanying documentation that exists along side it. For our state machine above, that documentation would look something like this:
Running State
The player is running along the bottom or top of the screen. The appropriate running animation is playing based on which side of the screen the player is on.
Enter Actions: Play the appropriate run animation.
Transitions [next state: trigger]:
Jumping: Action key pressed
Dead: Hit an obstacle
Jumping State
The player is jumping from either the the top of the screen to the bottom, or the bottom of the screen to the top. The appropriate jump animation plays depending on the jump direction.
Enter Actions: Play the appropriate jump animation, play the jump sound effect, reverse gravity.
Transitions [next state: trigger]:
Running: Player lands on ceiling or ground
Jumping: Action key pressed
Dead: Hit an obstacle
Dead State
The player has hit an obstacle and died. The game stops and the final score is displayed.
Enter Actions: Hide player sprite, play death animation, play death sound effect, show final score
Transitions [next state: trigger]:
Running: The game restarts
Nested State Machines
If you tried to create a single state machine for every aspect of your game, it would quickly become too large to easily manage or implement. Instead, it is common to have separate state machines withing different states. These are called nested, or sub-state machines, because they exist as part of another state rather than on their own. In fact, a sub-state machine IS the parent state. It is defines what it means to be in that state.
Consider the following state machine that defines the overall game states.

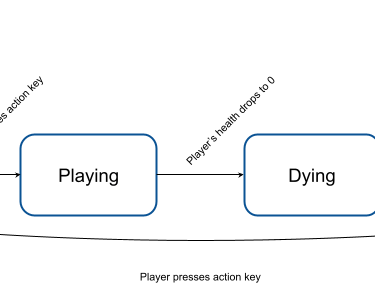
This is a very high-level state machine. While in the Playing state, the player can run and jump and collect coins (i.e., our previous state machine defined above). Rather than trying to reflect all of that in the same state machine, we can define it as a sub-state machine within the Playing state.
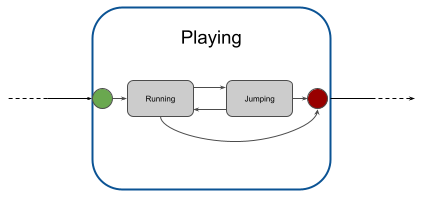
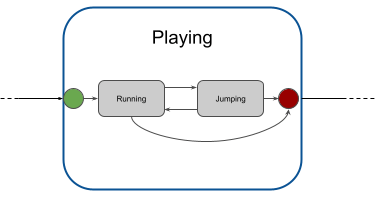
This sub-state machine looks a little different that the one we defined above, because it's now part of a larger state machine, so when the player dies, you no longer transition to another state within the Playing state, rather that is the trigger to transition out of the Player state (the line to the red circle). This sub-state machine will only run while the game is in the Playing state. While in the Title Screen or Dying states, the player cannot run or jump.
Implementing State Machines
So far we've only covered what a state machine is and how to define one on paper, so how does this actually translate into code and nodes in your game? There is no single answer to that. How you go about implementing a state machine is entirely up to you, and it can vary between different state machines, even in the same game. You can likely find 3rd party assets to assist you in constructing state machines, but for very simple ones a common approach is to simply have a class that manages your state machine, using an enumeration to define the different states.
For example, for our Player sub-state machine (Running and Jumping states), we've technically already implemented this in the Player class. When the player is grounded (either on the ground or ceiling), he is in the Running state, and when he jumps, he transitions to the Jumping state. If we wanted to, we could make this a little more explicit by added a state property to the Player.gd script and call functions like transitionToRunning() and transitionToJumping(), but that's a bit overkill for such a simple state machine.
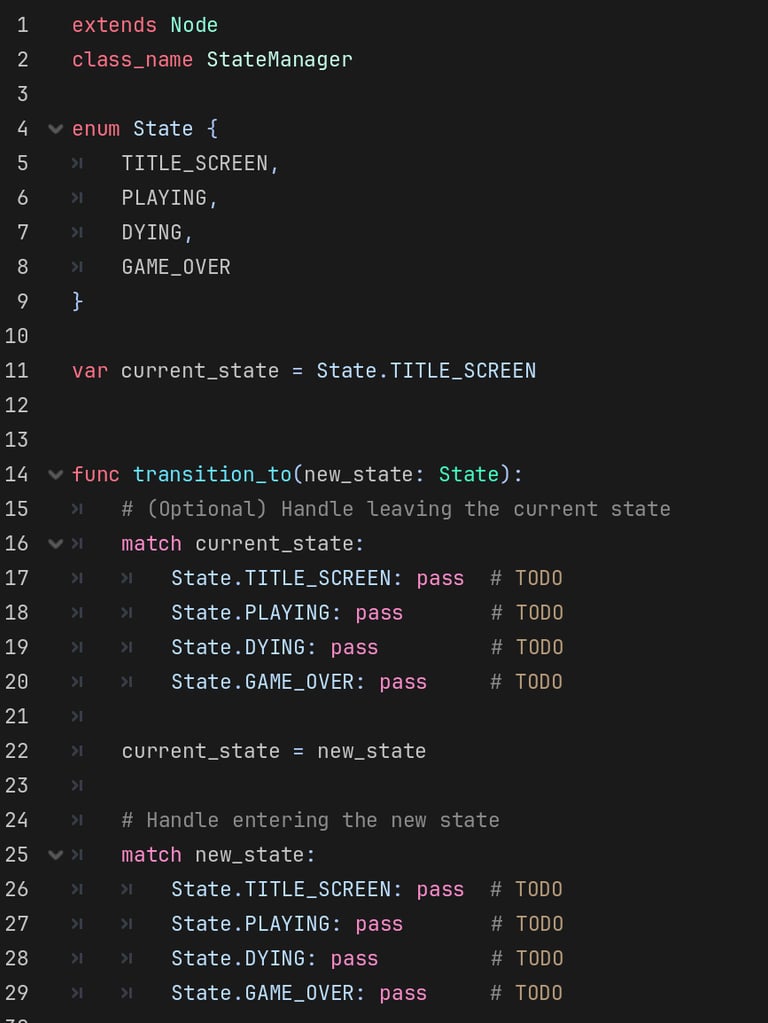
For our overall game state management (Title Screen, Playing, Dying, Game Over), it makes more sense to have a dedicated class to managing the game state, and define an enumeration with the different states. For this class, we would create an enum that defines the different states, and a variable that keeps track of the current state. Then we can define a function to handle transitioning to new states.
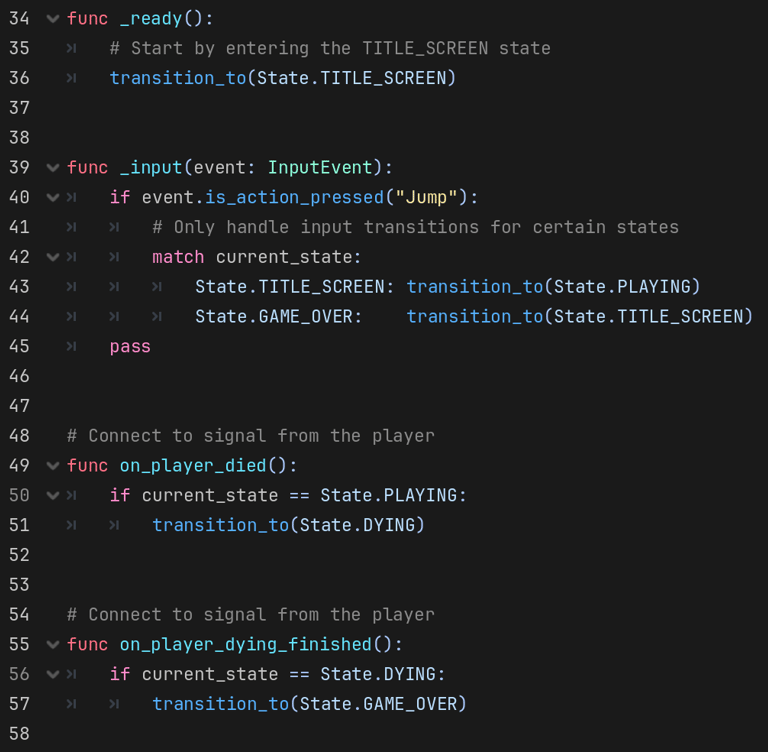
Then we just need to add functions to transition to each state based on different triggers.
Again, this is just one possible way to implement such a state machine. Another possible implementation would be to have a slightly more generic StateManagement script attached to a parent Node, and then implement each state in their own scripts which are attached to child nodes. Each state script would be expected to have some common interface, such as enter() and exit() functions, and a function to return the next state to transition to.
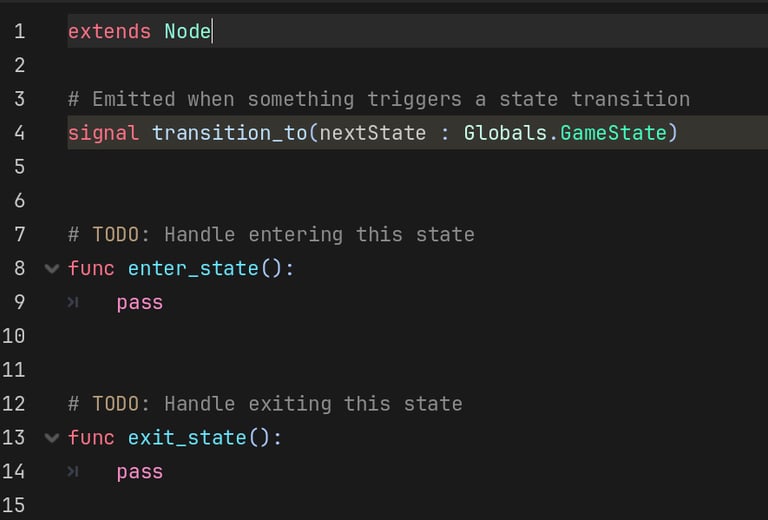
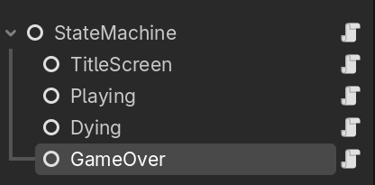
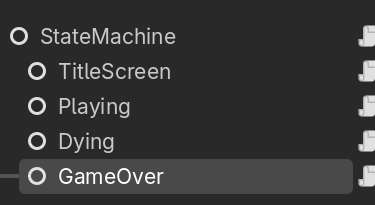
The parent StateMachine node would manage the current state, and rely on the state to tell it when it's time to transition to a new state, and what state to transition to. This is slightly more complicated to implement, but is a lot more flexible. Each state is self-contained, and it's a lot easier to add new state by simply adding new child nodes with their own state script. It also has the advantage of being more reusable. The parent StateMachine script can be used to manage any state machine, because the actual structure of the state machine is defined by the child nodes, and the parent just manages the current state.
Homework
(Optional) Create State Machine Diagram For Game
If you're just following along in class, then the state machine diagrams on this page (more or less) accurately define the state machines used in our game. However, if you've taken a different approach in your game and have different states/behaviors, take the time to create a state machine diagram that defines that state management for your game.
Update Player Script
Add a died() signal to Player.gd
Emit the died() signal when the player dies (health reaches 0, or just hits an obstacle, depending on how your player is implemented)
Implement a State Machine For Overall Game State
(As stated on this page, there are a lot of ways to do this. I'll only cover one, but feel free to explore other approaches)
(You may need to make changes to other nodes/scripts in your game to support state management, such as resetting the score, resetting the player position, resetting the background, etc...)
Add a child node to the Main scene, rename it StateManagement.
Add a new script to the StateManagement node called StateManagement.gd
Define a State enum with values TITLE_SCREEN, PLAYING, DYING, and GAME_OVER
Add a current_state class variable to keep track of the current game state.
Add a transition_to(newState) function to handle state transitions.
Update the value of current_state to the new state.
Match on the new state:
For each state, update the game appropriately (ex, hide the Title Screen UI, start the wave spawner, show the score label, etc.)
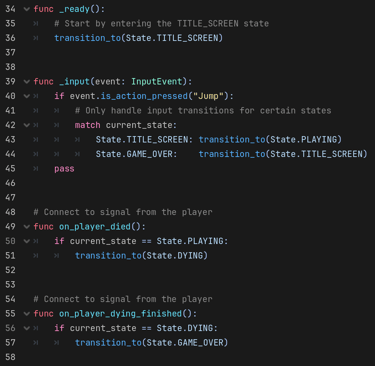
In your script's _ready() function, transition to the TITLE_SCREEN state. This is the initial state to start in.
Add an _input() function to handle state transitions when the "Jump" action is pressed:
Transition from TITLE_SCREEN -> PLAYING
Transition from GAME_OVER -> TITLE_SCREEN
Add function for on_player_died()
Connect to died() signal from Player
Transition from PLAYING -> DYING
Add function for on_player_dying_finished()
When transitioning to the DYING state, start a timer and connect its timeout() signal to this new function.
Transition from DYING -> GAME_OVER